tP Week 10: mid-v2.0tP Week 12: Extra week for v2.0


tP Week 11: v2.0

  1. Update UG and DG
  2. Review others' DG during the tutorial
  3. Deliver v2.0 Thu, Nov 7th 23:59
  4. Draft the PPP

Intro to tP Week 11

Things to note:

  • Aim to reach the final version in this iteration itself: After this iteration is over, you get a chance to fix your tP bugs (in the project, as well as documentation) without any penalty. What's more, others will help you find those bugs (via tutorial activities and the PE Dry Run happening at the end of this iteration).
    To take advantage of the above, try to make your v2.0 (product, DG, and UG) as close to what you intend to submit as your final version (i.e., v2.1).
  • You have two weeks to finish tP tasks listed under this week due to the extra week added on account of holidays.

1 Update UG and DG

  • Update the User Guide to match the current version of the product. Reason: testers will need to refer to the UG during the practical exam dry run.
    • Clearly indicate which features are not implemented yet e.g. tag those features with a Coming soon.
    • For those features already implemented, ensure their descriptions match the exact behavior of the product e.g. replace mockups with actual screenshots

  • Save the UG as a PDF file using this technique exactly. You'll need this file later when you create a product release. There is no specific file name convention for this version of the UG, but do use a reasonable file name: e.g., Contacts-Pro-User-Guide.pdf.

  • Similarly, update the Developer Guide (DG), and save it as PDF file.

Admin tP Deliverables → DG → Tips
  • Aim to showcase your documentation skills. The primary objective of the DG is to explain the design/implementation to a future developer, but a secondary objective is to serve as evidence of your ability to document deeply-technical content using prose, examples, diagrams, code snippets, etc. appropriately. To that end, you may also describe features that you plan to implement in the future, even beyond v2.1 (hypothetically).
    For an example, see the description of the undo/redo feature implementation in the AddressBook-Level3 developer guide.

  • Use multiple UML diagram types. Following from the point above, try to include UML diagrams of multiple types to showcase your ability to use different UML diagrams.

  • Diagramming tools:

    • AB3 uses PlantUML (see the guide Using PlantUML @SE-EDU/guides for more info).
    • You may use any other tool too (e.g., PowerPoint). But if you do, note the following:
      • Choose a diagramming tool that has some 'source' format that can be version-controlled using git and updated incrementally (reason: because diagrams need to evolve with the code that is already being version controlled using git). For example, if you use PowerPoint to draw diagrams, also commit the source PowerPoint files so that they can be reused when updating diagrams later.
      • Use the same diagramming tool for the whole project, except in cases for which there is a strong need to use a different tool due to a shortcoming in the primary diagramming tool. Do not use a mix of different tools simply based on personal preferences.
    • Can UML diagrams be used in project submissions? Not a good idea. Given below are three reasons each of which can be reported by evaluators as 'bugs' in your diagrams, costing you marks:
      • They often don't follow the standard UML notation (e.g., they add extra icons).
      • They tend to include every little detail whereas we want to limit UML diagrams to important details only, to improve readability.
      • Diagrams reverse-engineered by an IDE might not represent the actual design as some design concepts cannot be deterministically identified from the code e.g., differentiating between multiplicities 0..1 vs 1, composition vs aggregation.
  • Keep diagrams simple. The aim is to make diagrams comprehensible, not necessarily comprehensive.
    Ways to simplify diagrams:

    • Omit less important details. Examples:
      • a class diagram can omit minor utility classes, private/unimportant members; some less-important associations can be shown as attributes instead.
      • a sequence diagram can omit less important interactions, self-calls, method parameters, etc.
        Tip: You can use ... (e.g., foo(...)) to indicate parameters have been omitted.
        Tip: You can use pseudocode instead of exact method calls e.g., save data in file instead of saveData(content, filename).
    • Omit repetitive details e.g., a class diagram can show only a few representative ones in place of many similar classes (note how the AB3 Logic class diagram shows concrete *Command classes using a placeholder XYZCommand).
    • Limit the scope of a diagram. Decide the purpose of the diagram (i.e., what does it help to explain?) and omit details not related to it.
    • Break diagrams into smaller fragments when possible.
      • If a component has a lot of classes, consider further dividing into subcomponents (e.g., a Parser subcomponent inside the Logic component). After that, subcomponents can be shown as black-boxes in the main diagram and their details can be shown as separate diagrams.
      • You can use ref frames to break sequence diagrams to multiple diagrams.
    • Use visual representations as much as possible. E.g., show associations and navigabilities using lines and arrows connecting classes, rather than adding a variable in one of the classes.
    • For some more examples of what NOT to do, see here.
  • Integrate diagrams into the description. Place the diagram close to where it is being described.

  • Use code snippets sparingly. The more you use code snippets in the DG, and longer the code snippet, the higher the risk of it getting outdated quickly. Instead, use code snippets only when necessary and cite only the strictly relevant parts only. You can also use pseudocode instead of actual programming code.

  • Resize diagrams so that the text size in the diagram matches the text size of the main text of the diagram. See example.


2 Review others' DG during the tutorial

  • To be done during the tutorial. Please don't do this task before the tutorial as others need time to update their DGs.
  • Read all instructions before you start the activity.
  • Find the team choices you have been allocated to review, as given in the panel below.

Allocation for DG review


  • Decide which of the given team(s) to review:

    • Open the DG link of the team allocated as 'First choice'.
    • Confirm that the DG has significant updates, to the diagrams in particular. If it doesn't, you can try the DG of the 'Second choice' team, and failing that, 'Third choice' team.
    • If neither one of the three has enough updates but collectively they have enough updates, you can also review all of them.
    • Failing all above, you can pick any other team(s) to review.
    • Try to give at least 4 comments in total.
    • If the PR already has reviews, you can give your own input of the existing review comments too.
  • Go to the PR of the team(s) you have chosen to review.

  • Review the Design and the Implementation sections w.r.t possible DG bugs (given further down); add your observations as comments.

  • In the PR, add review comments (i.e., in the files changed tab) in the corresponding place of the code.
    • In this case, choose the option rather than option.
  • But if the 'files changed' tab is too laggy, you can add a normal comment instead in the conversation tab.
    • In this case, enter each observation as a separate comment (reason: our bot will count the number of comments you have given to determine if you qualify for participation points)
  • As you know, it is better to phrase your comments as question/doubts (e.g., Is this format correct? Should it be ... instead?) rather than directives (e.g., Change this to ...).
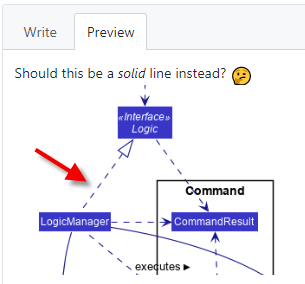
    Where possible, use screenshots from their DG in your comments, preferably with annotations. This is particularly useful when commenting on diagrams. An example given below:
  • The understanding you gain from this exercise can indirectly determine how well you do in your own project. Note that your comments will be reviewed by a tutor later.
DG - Possible Bugs

Pay attention to these as they are same as the final evaluation criteria of the DG.

Admin tP Grading → DG Bugs → UML Diagrams → Possible Bugs

UML diagrams:

  • Notation incorrect or not compliant with the notation covered in the course.
  • Some other type of diagram used when a UML diagram would have worked just as well.
  • The diagram used is not suitable for the purpose it is used.
  • The diagram is too complicated.

Admin tP Grading → General Documentation Bugs

Use of visuals

  • Not enough visuals e.g., screenshots/diagrams
  • The visuals are not well integrated to the explanation
  • The visuals are unnecessarily repetitive e.g., same visual repeated with minor changes

Use of examples:

  • Not enough or too many examples e.g., sample inputs/outputs

Explanations:

  • The target user for the product and/or the value proposition is not specified clearly.
  • The explanation is too brief or unnecessarily long.
  • The information is hard to understand for the target audience. e.g., using terms the reader might not know

Neatness/correctness:

  • looks messy
  • not well-formatted
  • broken links, other inaccuracies, typos, etc.
  • hard to read/understand
  • unnecessary repetitions (i.e., hard to see what's similar and what's different)

Also see:

Admin tP: Deliverables → DG → Tips

  • Aim to showcase your documentation skills. The primary objective of the DG is to explain the design/implementation to a future developer, but a secondary objective is to serve as evidence of your ability to document deeply-technical content using prose, examples, diagrams, code snippets, etc. appropriately. To that end, you may also describe features that you plan to implement in the future, even beyond v2.1 (hypothetically).
    For an example, see the description of the undo/redo feature implementation in the AddressBook-Level3 developer guide.

  • Use multiple UML diagram types. Following from the point above, try to include UML diagrams of multiple types to showcase your ability to use different UML diagrams.

  • Diagramming tools:

    • AB3 uses PlantUML (see the guide Using PlantUML @SE-EDU/guides for more info).
    • You may use any other tool too (e.g., PowerPoint). But if you do, note the following:
      • Choose a diagramming tool that has some 'source' format that can be version-controlled using git and updated incrementally (reason: because diagrams need to evolve with the code that is already being version controlled using git). For example, if you use PowerPoint to draw diagrams, also commit the source PowerPoint files so that they can be reused when updating diagrams later.
      • Use the same diagramming tool for the whole project, except in cases for which there is a strong need to use a different tool due to a shortcoming in the primary diagramming tool. Do not use a mix of different tools simply based on personal preferences.
    • Can UML diagrams be used in project submissions? Not a good idea. Given below are three reasons each of which can be reported by evaluators as 'bugs' in your diagrams, costing you marks:
      • They often don't follow the standard UML notation (e.g., they add extra icons).
      • They tend to include every little detail whereas we want to limit UML diagrams to important details only, to improve readability.
      • Diagrams reverse-engineered by an IDE might not represent the actual design as some design concepts cannot be deterministically identified from the code e.g., differentiating between multiplicities 0..1 vs 1, composition vs aggregation.
  • Keep diagrams simple. The aim is to make diagrams comprehensible, not necessarily comprehensive.
    Ways to simplify diagrams:

    • Omit less important details. Examples:
      • a class diagram can omit minor utility classes, private/unimportant members; some less-important associations can be shown as attributes instead.
      • a sequence diagram can omit less important interactions, self-calls, method parameters, etc.
        Tip: You can use ... (e.g., foo(...)) to indicate parameters have been omitted.
        Tip: You can use pseudocode instead of exact method calls e.g., save data in file instead of saveData(content, filename).
    • Omit repetitive details e.g., a class diagram can show only a few representative ones in place of many similar classes (note how the AB3 Logic class diagram shows concrete *Command classes using a placeholder XYZCommand).
    • Limit the scope of a diagram. Decide the purpose of the diagram (i.e., what does it help to explain?) and omit details not related to it.
    • Break diagrams into smaller fragments when possible.
      • If a component has a lot of classes, consider further dividing into subcomponents (e.g., a Parser subcomponent inside the Logic component). After that, subcomponents can be shown as black-boxes in the main diagram and their details can be shown as separate diagrams.
      • You can use ref frames to break sequence diagrams to multiple diagrams.
    • Use visual representations as much as possible. E.g., show associations and navigabilities using lines and arrows connecting classes, rather than adding a variable in one of the classes.
    • For some more examples of what NOT to do, see here.
  • Integrate diagrams into the description. Place the diagram close to where it is being described.

  • Use code snippets sparingly. The more you use code snippets in the DG, and longer the code snippet, the higher the risk of it getting outdated quickly. Instead, use code snippets only when necessary and cite only the strictly relevant parts only. You can also use pseudocode instead of actual programming code.

  • Resize diagrams so that the text size in the diagram matches the text size of the main text of the diagram. See example.


  • After the tutorial, if you are unsure about a concern raised by a reviewer, you can post in the forum to seek the opinion of the teaching team.

3 Deliver v2.0 Thu, Nov 7th 23:59

  • Finish implementing the features you intend to have in the final version.

Ways to level up your tP game:

  • Consider increasing test coverage by adding more tests if it is lower than the level you would like it to be. Take note of our expectation on test code (given in the panel below).

  • After you have sufficient code coverage, fix remaining code quality problems and bring up the quality to your target level. Note that the quality of the code attributed to you accounts for a significant component of your final score, graded individually (based on the code attributed to you by the tP code dashboard).

  • Do a release on GitHub and upload the following files, each as a separate asset. Do this before the deadline as PE-D testers will start downloading these files ahead of time.:
    1. v2.0 JAR file
    2. UG PDF file
    3. DG PDF file
  • IMPORTANT: ensure your jar file was generated using Java 17 and can work on all major OS'es using JDK 17.

  • Wrap up the milestone on GitHub.

4 Draft the PPP

This task is time-sensitive. If done later than the deadline, it will not be counted as 'done' (i.e., no grace period).

  • Create the first version of your Project Portfolio Page (PPP).Each member needs to create a PPP to describe your contribution to the project.

Admin tP → Deliverables → Project Portfolio Page

At the end of the project each student is required to submit a Project Portfolio Page.

PPP Objectives

  • For you to use (e.g. in your resume) as a well-documented data point of your SE experience
  • For evaluators to use as a data point for evaluating your project contributions

PPP Sections to include

  • Overview: A short overview of your product to provide some context to the reader. The opening 1-2 sentences may be reused by all team members. If your product overview extends beyond 1-2 sentences, the remainder should be written by yourself.
  • Summary of Contributions --Suggested items to include:
    • Code contributed: Give a link to your code on tP Code Dashboard. The link is available in the Project List Page -- linked to the icon under your profile picture.
    • Enhancements implemented: A summary of the enhancements you implemented.
    • Contributions to the UG: Which sections did you contribute to the UG?
    • Contributions to the DG: Which sections did you contribute to the DG? Which UML diagrams did you add/updated?
    • Contributions to team-based tasks
    • Review/mentoring contributions: Links to PRs reviewed, instances of helping team members in other ways.
    • Contributions beyond the project team:
      • Evidence of helping others e.g. responses you posted in our forum, bugs you reported in other team's products,
      • Evidence of technical leadership e.g. sharing useful information in the forum

Keep in mind that evaluators will use the PPP to estimate your project effort. We recommend that you mention things that will earn you a fair score e.g., explain how deep the enhancement is, why it is complete, how hard it was to implement etc.

  • OPTIONAL Contributions to the Developer Guide (Extracts): Reproduce the parts in the Developer Guide that you wrote. Alternatively, you can show the various diagrams you contributed.
  • OPTIONAL Contributions to the User Guide (Extracts): Reproduce the parts in the User Guide that you wrote.

PPP Format

  • File name (i.e., in the repo): docs/team/github_username_in_lower_case.md e.g., docs/team/goodcoder123.md
  • Follow the example in the AddressBook-Level3
  • For the final submission of the PPP (at the end of the tP), you need to save your PPP as a PDF file. Therefore, ensure the PDF version of the PPP looks OK at least a few days before the final submission.

Don't take PDF conversion lightly: To convert the UG/DG/PPP into PDF format, go to the generated page in your project's github.io site and use this technique to save as a pdf file. Using other techniques or not following the settings suggested in the given technique can result in issues such as missing background colors, poor quality resolution, unnecessarily large files (the last two can be considered as bugs).

The PDF versions of the UG/DG/PPP should be usable by the target readers, even if not as neat/optimized as the Web versions. For example, margins and page breaks need not be optimized, but they should not hinder the reader either. Assume some will occasionally choose the PDF version over the Web version e.g, for printing, offline viewing, annotating etc.

PE uses the PDF versions of UG/DG, not the Web version! Any problems in those PDF files (e.g., broken links, messed up formatting) can be reported as bugs.

Ensure hyperlinks in the pdf files work. Broken/non-working hyperlinks in the PDF files will be considered as bugs. Again, use the conversion technique given above to ensure links in the PDF files work.

PDF files should,

  • be paginated at a reasonable page size (e.g., A4). Reason: single-page PDF files don't work well in some PDF viewers, and not suitable for printing either.
  • allow copying text so that readers can copy text from them (e.g., copy an example command from the UG).

Try the PDF conversion early. If you do it at the last minute, you may not have time to fix any problems in the generated PDF files (such problems are more common than you think).

PPP Page Limit

Content Recommended Hard Limit
Overview + Summary of contributions 0.5-1 2
[Optional] Contributions to the User Guide 1
[Optional] Contributions to the Developer Guide 3
  • The page limits given above are after converting to PDF format. The actual amount of content you require is actually less than what these numbers suggest because the HTML → PDF conversion adds a lot of spacing around content.

Convert the PPP to a PDF to see if the page-count is within expectations (the PDF version can be longer than what you would expect by looking at the HTML version).


tP Week 10: mid-v2.0tP Week 12: Extra week for v2.0